
This is not a tutorial nor am I an expert in anything here. I am learning and documenting as I learn. Things here may be wrong, feel free to point them out and reach out to me :)
Introduction
I’ve been very interested in building my own crypto-currency for a very long time now, almost a year. I started by initially creating a bitcoin clone by simply altering the existing repo, this proved to be not very fun nor was it very straightforward. About 6-7 months ago I stumbled upon a medium article titled Let’s Build the Tiniest Blockchain by Gerald Nash my intrigue was piqued and has stayed so since then. So in my boredom late at night, I have selected to make my own blockchain from the ground up. The article was a massive start and well written but was missing functions and features I wanted to learn more of and some I had no idea existed. So this is my journey building my own crypto-currency from the ground up (with a little help from Nash of course 🤓) and as an added challenge I will be using javascript as I want more experience using it.
Block
So the first thing we probably need to define is how our transactions and block will be formatted and stored. The data we need to store is:
- index/depth/height - (depending on your choice of terminology) the block number.
- timestamp - the time & date block was mined.
- data - this will contain all the transactions sent to our node before the block was mined.
- previous_hash - the hash of the most recently mined block to keep track of the depth and helps ensure the integrity of the blockchain.
- nonce - one-time use number used to achieve certain criteria when mining (will talk more about this later)
- hash - the hash of this block
NOTE: I am a big Cardano fan and Cardano uses slots and epochs instead of blocks
1
2
3
4
5
6
7
8
9
10
11
12
13
14
15
16
17
18
19
20
21
const crypto = require('crypto')

class Epoch {
    constructor(epoch, epoch_header, timestamp, data, nonce, previous_hash) {
        this.epoch = epoch;
        this.timestamp = timestamp;
        this.data = data;
        this.nonce = nonce;
        this.previous_hash = previous_hash;
        this.hash = this.hash_epoch();
    }

    epoch_tostring() {
        return (this.epoch + this.timestamp + this.data + this.nonce + this.previous_hash)
    }

    // Generate hash from epoch data...
    hash_epoch() {
        return crypto.createHash('sha256').update(this.epoch_tostring()).digest('hex')
    }
};
Genesis
Next, we need to start our server which in my case will create our genesis epoch. So the genesis epoch is the initial epoch or block of any blockchain, for example, bitcoin’s genesis block occurred on January 3rd 2009. So I created an express server that will generate our genesis epoch although this has to be manually done and I will most likely deprecate this function once a stable, near complete blockchain going.
1
2
3
4
5
6
7
8
9
10
11
12
const Epoch = require("./epoch.js");

function create_genesis_epoch(data) {
    let nonce = Math.floor(Math.random() * (9999999999 - 1000000000)) + 1000000000;
    let genesis_epoch = new Epoch(0, Date.now(), data, nonce, "0");
    while (genesis_epoch.hash.substring(0,4) != "0000") {
        nonce = Math.floor(Math.random() * (9999999999 - 1000000000)) + 1000000000;
        genesis_epoch = new Epoch(0, Date.now(), data, nonce, "0");
    }
    console.log(genesis_epoch);
    return genesis_epoch
}
So there’s kind of a lot going on here, and many different ways you can achieve this. In nash’s version, he created a genesis block by manually populating the fields of the block object and returning it. I for fun wanted to use a Proof of Work algorithm similar to that of bitcoin because… why not? So if you go read his article (as you should if you’re interested in such topics as this) then he later implements a simple PoW algorithm, but I wanted something a bit more complex. So as you probably saw earlier I added a field in the epoch class called “nonce” this is a number that should only be used once and the goal of this number is to produce a hash of the block with certain criteria.
1
2
nonce = Math.floor(Math.random() * (9999999999 - 1000000000)) + 1000000000;
genesis_epoch = new Epoch(0, Date.now(), data, nonce, "0");
In these two lines, I create a random number from 1000000000 to 9999999999, this plays an important role in my proof of work algorithm. When mining for new blocks we need to satisfy the condition that the first 4 characters of an epoch’s hash be 0’s, before we accept them and append them to the chain.
Proof of Work
I already mentioned how I wanted the proof of work algorithm to function. I will reiterate it anyway because it’s cool 😎. Nash used a Pow algorithm of taking some work value and incrementing it until it was divisible by 9. This works and serves as a great way to convey the use of such a function, However, I wish to (as always) overcomplicate things. I have provided a breakdown of how I wanted to create my proof of work algorithm. .png) Now that we got the PoW sorted let’s look at the code.
Now that we got the PoW sorted let’s look at the code.
1
2
3
4
5
6
7
8
9
10
11
function vts_pow (previous_epoch, data) {
    let nonce = Math.floor(Math.random() * (9999999999 - 1000000000)) + 1000000000;
    let new_epoch = new Epoch(previous_epoch.epoch+1, Date.now(), data, nonce, previous_epoch.hash);
    while (new_epoch.hash.substring(0,4) != "0000") {
        nonce = Math.floor(Math.random() * (9999999999 - 1000000000)) + 1000000000;
        new_epoch = new Epoch(previous_epoch.epoch+1, Date.now(), data, nonce, previous_epoch.hash);
    }

    this_node_tx.push("{'sender':'Network', 'receviver': 'test_addr', 'Amount':1}");
    return new_epoch
}
As you can tell it’s almost identical to the genesis function, this was not required but I did it to maintain some consistency. There are however a few changes, we see that near the end we append a new transaction where the network appends a new transaction for the node to process in the next block. This is for the miner as a reward for producing the next block. As I’m sure you are yelling at the screen, yes this is a terrible spot to append that particular transaction “IT SHOULD BE IN THE CURRENT BLOCK”, I KNOW!! I will refactor that in the next part. I simply ran out of time tonight. Rest assured it will be fixed.
Transactions
So to recap we now have our block, genesis, and PoW setup, we are still missing a core component before VTSxCOIN can blow up in value and reach 0.00000000000 USD. Transactions! So Currently having followed the steps Nash has laid out for us and have currently opted to use a JSON format like so:
1
2
3
4
5
{
    "sender":"Network",
    "recipient": "test_addr",
    "Amount":1
}
Node Server
So now we got everything next we need to set up a node server. So that we can make this currently centralized blockchain decentralized. Since we only have the MVP here we only really need two routes, submit transaction and mine. Submit Tx means when we want to send our “Bags” to someone else we need to submit the transaction to a node, where it will be placed into a pool of other transactions ready to be placed into a block. The block where we want our transactions to be placed is produced by the node in the “/mine” route.
1
2
3
4
5
6
7
8
9
10
11
12
13
14
15
app.post('/tx', (req, res) => {
    this_node_tx.push(req.body);
    console.log(req.body);
    console.log(this_node_tx);
});


app.get('/mine', (req, res) => {
    if (epochs.length == 0) {
        epochs.push(create_genesis_epoch("Genesis"));
    }
        last_epoch = epochs[epochs.length-1];
        new_epoch = vts_pow(last_epoch, this_node_tx.toString());

});
I currently have the genesis being created in the mining route as the persistent blockchain does not currently exist. Once a persistent chain is ongoing this will be deprecated.
TODO
While the foundation is here and the drive to add more is equally here, there’s still so much more to do.
Merkle Root
Merkle trees I have since learned have a huge role in making blockchain technology even feasible, I will be looking to refactor the blocks to utilize Merkle trees in the next update (Pt 2). The function of Merkle trees is to maintain and be able to look up transactions by ID without having to scan through the entire blockchain. The underlying idea is that a block can have anywhere from 0-10000s of transactions. Before producing the block we must take the hash ids of each transaction and pair them with another transaction, we hash the concatenation of those two transaction hashes. Then we take those resulting hashes and pair them and hash them again. The process continues until there is a single hash remaining known as the Merkle root. 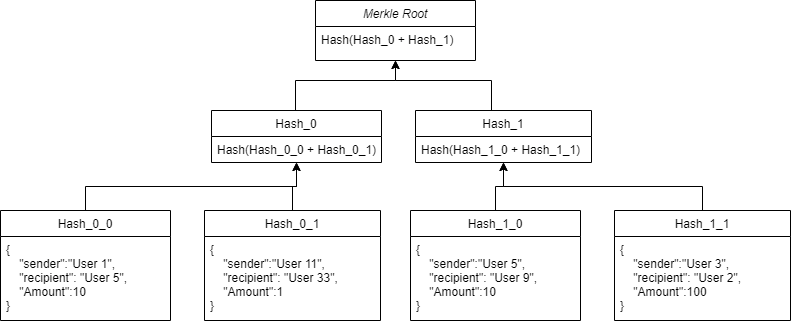
Transactions
After working with Cardano and utilizing some of the wallets and how that blockchain handles transactions I have decided to emulate it here as well. I could just use whatever addresses and call it a day but I want users to be able to generate new addresses without having to create new wallets and I need to add additional security. Right now anyone could be anyone, Thus I now need to add Public keys and Private keys so that transactions must be signed by a private key and sent along with a public key. The public key can be used to validate the transaction but only the private key can create new ones. wiki explanation
Peer to Peer communcation
I know, I know this should already be here. it’s almost noon and I have yet to sleep. ;-;
Nice To Haves
- Light wallets - wallets that are not dependent on a local node to operate, these will submit transactions to other nodes
- Blockchain Explorer