
This is not a tutorial nor am I an expert in anything here. I am learning and documenting as I learn. Things here may be wrong, feel free to point them out and reach out to me :)
Introduction
The motivation behind this quick project was to create a simple easy-to-use set of character controller scripts for myself to use and adapt/improve, I could have just written the code and kept it on GitHub or the playcanvas repo. I will keep it in the repo but in my years of development, I have a tendency to forget what and why I did certain things. traditional documentation for myself in the format of SRS and Project Docs is tedious and not fun to make, maintain, or read. That said I have found this format to be particularly effective for my bird brain.
Animation Controller
Customizable Input Keys
So for this demo I geared the controls to lean towards traditional PC FPS/TPS movement controls (i.e. W,A,S,D). To achieve those controls we allow the developer to simply input the ASCII value for a certain key via the playcanvas editor. This is to minimize the amount of code tweaks that would be required to acheive certain behavoir. 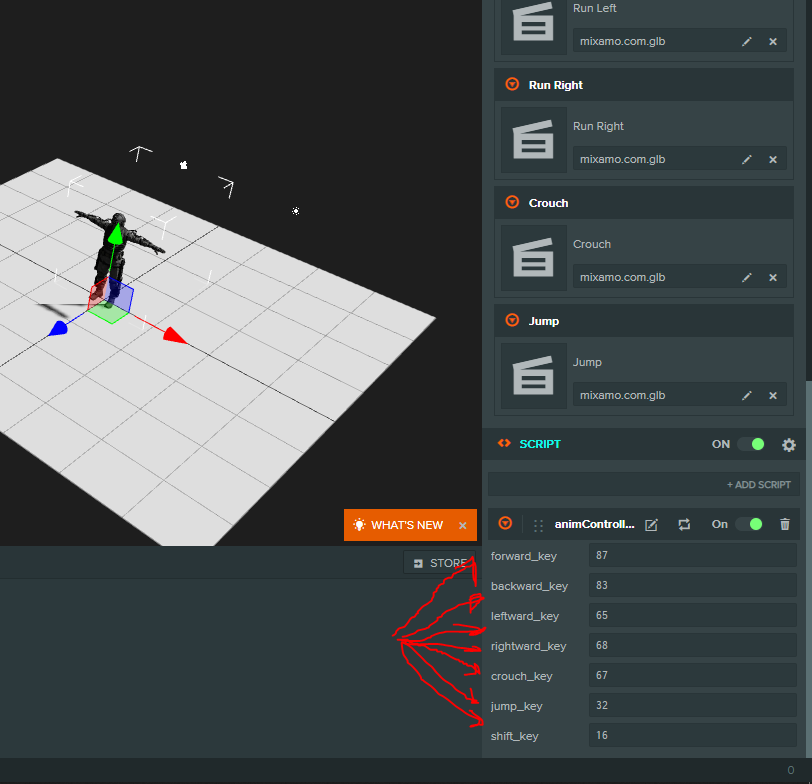
1
2
3
4
5
6
7
8
9
10
11
12
13
14
15
16
17
18
19
20
21
22
23
24
25
26
27
28
29
30
31
32
33
34
35
36
37
var AnimController = pc.createScript('animController');

AnimController.attributes.add("forward_key", {
    type: 'number',
    default: 87,
    description: "forward key ascii value"
});
AnimController.attributes.add("backward_key", {
    type: 'number',
    default: 83,
    description: "backward key ascii value"
});
AnimController.attributes.add("leftward_key", {
    type: 'number',
    default: 65,
    description: "leftward key ascii value"
});
AnimController.attributes.add("rightward_key", {
    type: 'number',
    default: 68,
    description: "rightward key ascii value"
});
AnimController.attributes.add("crouch_key", {
    type: 'number',
    default: 67,
    description: "crouch key ascii value"
});
AnimController.attributes.add("jump_key", {
    type: 'number',
    default: 32,
    description: "jump key ascii value"
});
AnimController.attributes.add("shift_key", {
    type: 'number',
    default: 16,
    description: "shift key ascii value"
});
Player State Management
The way I have broken down how player animation behaves is by defining a number of states that a player can enter and exit out of, while in certain states only certain behavoirs can be occur this makes it (in my opinion) easier to add, remove and maintain certain behavoirs while minimizing the number of possible side effects and unintended interference between states.
1
2
3
4
5
6
7
8
9
10
11
12
13
14
15
16
17
18
19
20
21
22
23
24
25
26
27
28
29
30
31
32
33
34
35
36
37
38
39
40
41
42
43
44
45
46
47
48
49
50
51
52
53
54
55
56
57
58
59
60
61
62
63
64
65
66
67
68
69
70
71
72
73
74
75
76
77
78
79
80
81
82
83
84
85
AnimController.prototype.playerStateManager = function(app) {
    switch(this.playerState) {
        case "walking":
            if (app.keyboard.isPressed(this.shift_key)) this.playerState = "sprint";
            if (app.keyboard.isPressed(this.jump_key)) this.playerState = "jumping";

            if (app.keyboard.isPressed(this.forward_key)) {
                this.changeMovementState(1);
            }
            else if (app.keyboard.isPressed(this.backward_key)) {
                this.changeMovementState(2);
            }
            else if (app.keyboard.isPressed(this.leftward_key)) {
                this.changeMovementState(3);
            }
            else if (app.keyboard.isPressed(this.rightward_key)) {
                this.changeMovementState(4);
            }
            else {
                this.playerState = "idle";
            }
        break;

        case "sprint":
            if (app.keyboard.isPressed(this.jump_key)) this.playerState = "jumping";
            if (app.keyboard.isPressed(this.forward_key) && app.keyboard.isPressed(this.shift_key)) {
                this.changeMovementState(5);
            }
            else if (app.keyboard.isPressed(this.backward_key) && app.keyboard.isPressed(this.shift_key)) {
                this.changeMovementState(6);
            }
            else if (app.keyboard.isPressed(this.leftward_key) && app.keyboard.isPressed(this.shift_key)) {
                this.changeMovementState(7);
            }
            else if (app.keyboard.isPressed(this.rightward_key) && app.keyboard.isPressed(this.shift_key)) {
                this.changeMovementState(8);
            }
            else {
                this.playerState = "idle";
            }
        break;

        case "crouching":
            if (app.keyboard.isPressed(this.jump_key)) this.playerState = "jumping";
            if (app.keyboard.isPressed(this.crouch_key)) {
                this.changeMovementState(9);
            }
            else {
                this.playerState = "idle";
            }
        break;

        case "jumping":
            // jumpState may contain more or may fire external scripts and functions to further handle jumping...
            this.jumpState(app, 10);
        break;

        case "idle":
        default:
        // Change the animation state back to idle...
        this.changeMovementState(0);
        if (app.keyboard.isPressed(this.jump_key))
            this.playerState = "jumping";
        if (app.keyboard.isPressed(this.crouch_key))
            this.playerState = "crouching";
        if (app.keyboard.isPressed(this.forward_key) || app.keyboard.isPressed(this.backward_key) || app.keyboard.isPressed(this.leftward_key) || app.keyboard.isPressed(this.rightward_key)) {
            this.playerState = "walking";
        }
        break;
    }
};

AnimController.prototype.jumpState = function (app, jumpState) {
    if (app.keyboard.isPressed(this.jump_key)) {
        this.changeMovementState(jumpState);
    }
    else {
        this.playerState = "idle";
    }
};


AnimController.prototype.changeMovementState = function(newState) {
    if (this.entity.anim.getInteger("animState") != newState) this.entity.anim.setInteger("animState", newState);
};
Here I have defined a several new playcanvas functions: changeMovementState(newState) is used to change the state if the animation state is not already in the correct state, jumpState(app, jumpState) is used to manage the jump state and animation, this might require more code to handle certain behavoir and is currently left realtively empty due to how varied jumping behavoir maybe project to project. playerStateManager(app) is the used to manage how and when player states transition.
Additional Infomation
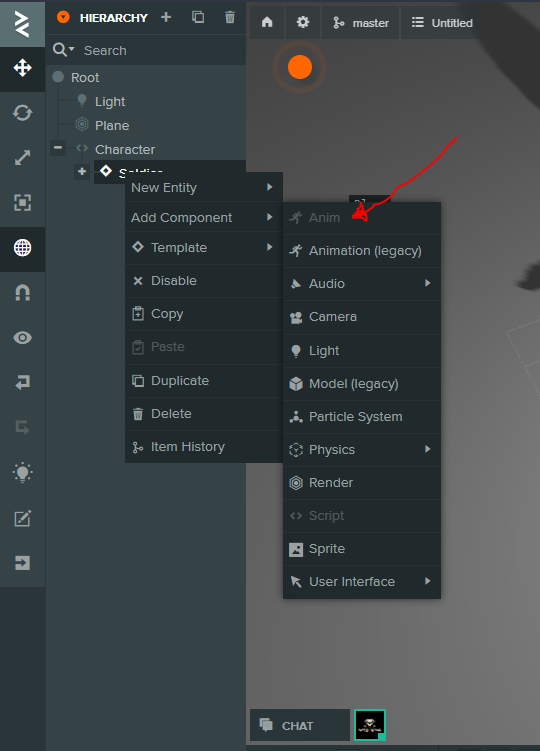
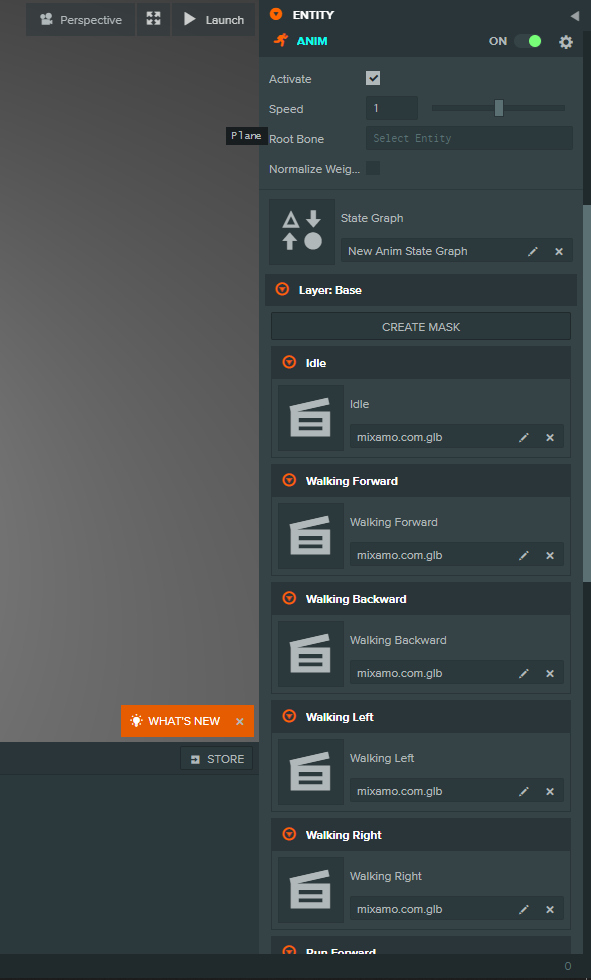
If your unfamilar with playcanvas animations or you are future me and need a refresher each object that requires a animated 3D models must have a ANIM component and the ANIM then must be given a Animation State Graph.
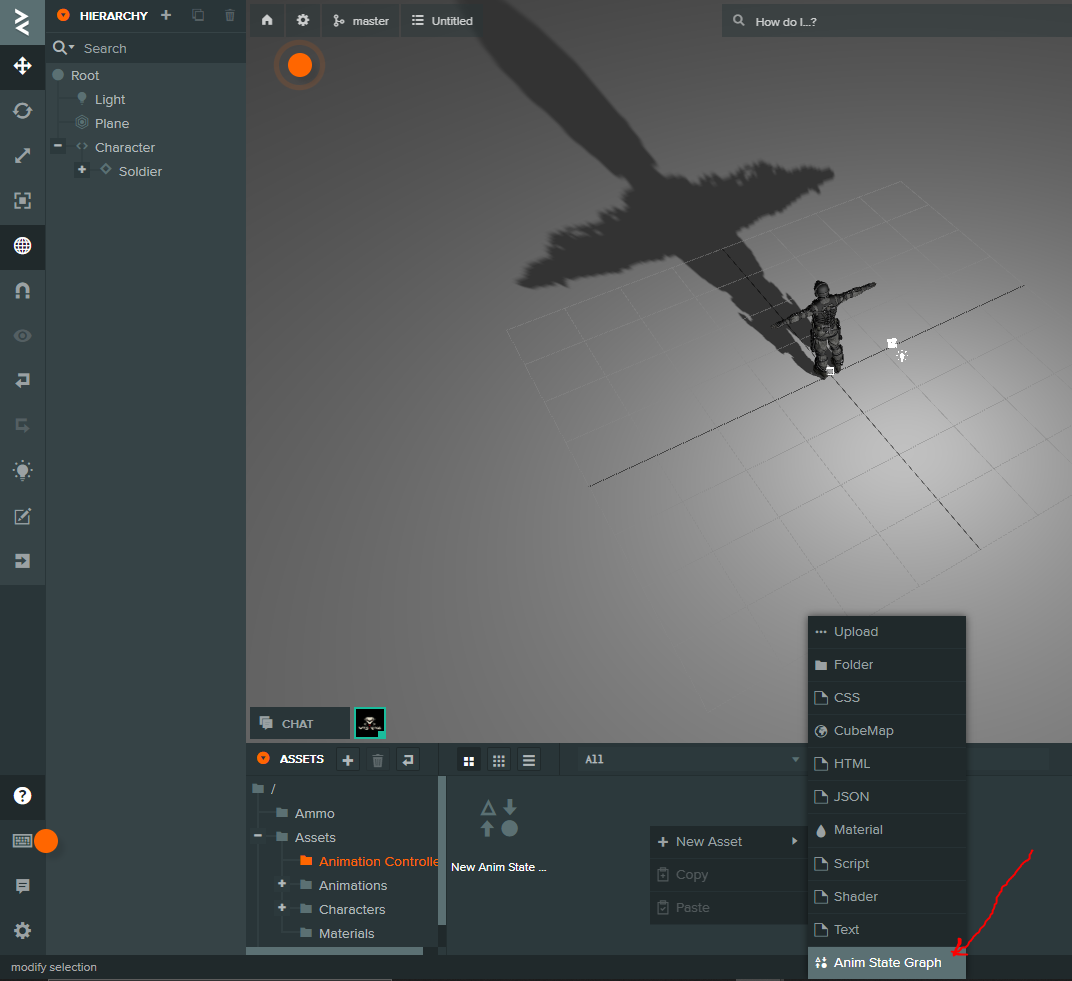
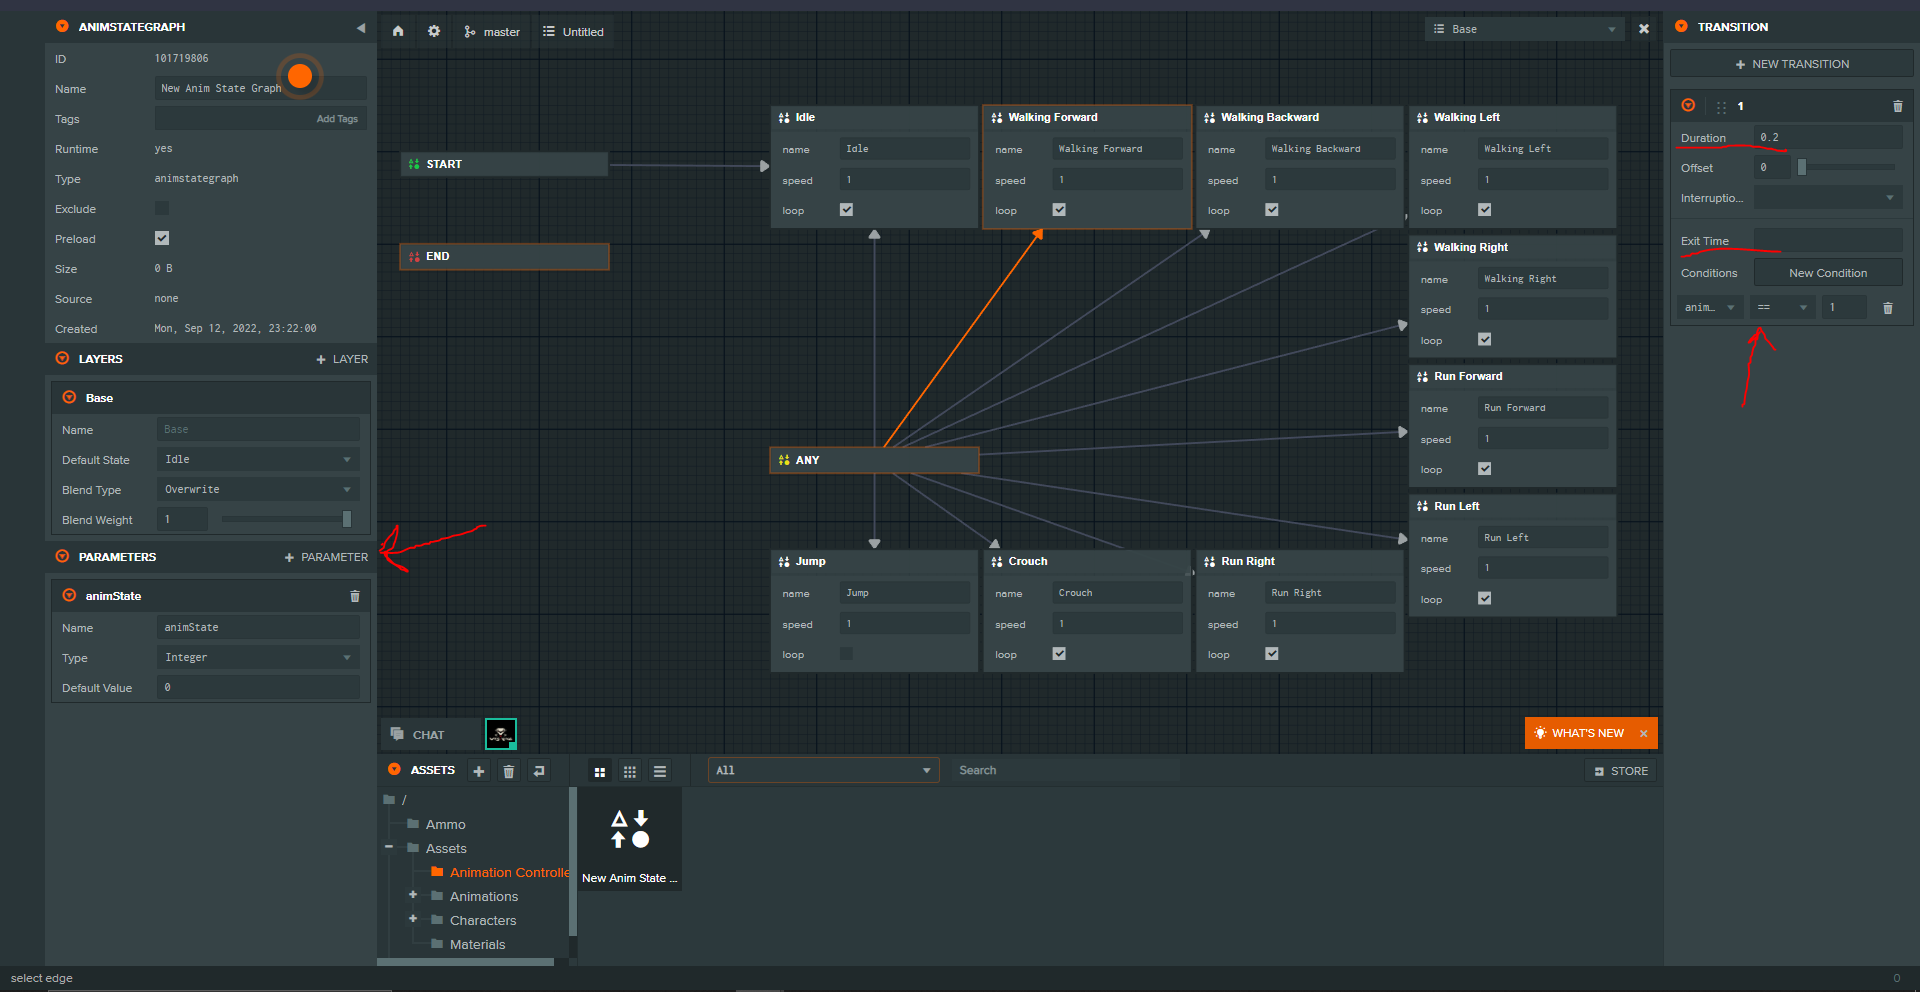
ANIM is acting a the link between your animations and the asset you want to animate, this component can also apply masks that allow you to blend animations together (I won’t go into detail with that here but I will in a later post). Once a Animation State Graph Asset has been created and added to your ANIM component you need to create your animation transitions, for this example I created a animSate integer that was used to determine which animation is to be played at any given time, and shown in the example below we see an example of how we should set this up.
After all that is complete simply add your animations in the editor and you should be good to go.
Result
Movement Controller
So we have our character animations set next we need to add actual movement. Although it should be mentioned that movement should be tailored for each project and there is no one size fits all. That being said in this demo I choose to go with something basic and is basically a copy of the third person movement system example in the playcanvas engine demos.
1
2
3
4
5
6
7
8
9
10
11
12
13
14
15
16
17
18
19
20
21
22
23
24
25
26
27
28
29
30
31
32
33
34
35
36
37
38
39
40
41
42
43
44
45
46
47
48
49
50
51
52
53
54
55
56
57
58
59
60
61
62
63
64
65
66
67
68
69
70
71
72
73
74
75
76
77
78
79
80
81
82
83
84
85
86
87
88
89
90
91
92
93
94
95
96
var MovementController = pc.createScript('movementController');

MovementController.attributes.add("forward_key", {
    type: 'number',
    default: 87,
    description: "forward key ascii value"
});
MovementController.attributes.add("backward_key", {
    type: 'number',
    default: 83,
    description: "backward key ascii value"
});
MovementController.attributes.add("leftward_key", {
    type: 'number',
    default: 65,
    description: "leftward key ascii value"
});
MovementController.attributes.add("rightward_key", {
    type: 'number',
    default: 68,
    description: "rightward key ascii value"
});
MovementController.attributes.add("crouch_key", {
    type: 'number',
    default: 67,
    description: "crouch key ascii value"
});
MovementController.attributes.add("jump_key", {
    type: 'number',
    default: 32,
    description: "jump key ascii value"
});
MovementController.attributes.add("shift_key", {
    type: 'number',
    default: 16,
    description: "shift key ascii value"
});
MovementController.attributes.add("speed", {
    type: 'number',
    default: 0.3,
    description: "the speed in "
});
MovementController.attributes.add("sprint_speed", {
    type: 'number',
    default: 0.6,
    description: "the speed in "
});

// initialize code called once per entity
MovementController.prototype.initialize = function() {
};

// Temp var to avoid garbage collection...
MovementController.worldDir = new pc.Vec3();
MovementController.tempDir = new pc.Vec3();

// update code called every frame
MovementController.prototype.update = function(dt) {
    let app = this.app;
    let worldDirection = MovementController.worldDir;
    worldDirection.set(0,0,0);

    let tempDirection = MovementController.tempDir;

    let forward = this.entity.forward;
    let right = this.entity.right;

    let x = 0;
    let z = 0;

    // apply changes to axis based on user input...
    if (app.keyboard.isPressed(this.forward_key)) z -= 1;
    if (app.keyboard.isPressed(this.backward_key)) z += 1;
    if (app.keyboard.isPressed(this.leftward_key)) x += 1;
    if (app.keyboard.isPressed(this.rightward_key)) x -= 1;

    if (x !== 0 || z !== 0) {
        // apply desired axis change to world orientation...
        worldDirection.add(tempDirection.copy(forward).mulScalar(z));
        worldDirection.add(tempDirection.copy(right).mulScalar(x));
        worldDirection.normalize();

        // calculate our new postion...
        let pos = new pc.Vec3(worldDirection.x * dt, 0, worldDirection.z * dt);
        // cal distance traveled by our speed and speed values...
        if (app.keyboard.isPressed(this.shift_key)) {
            pos.normalize().scale(this.sprint_speed);
        } else {
            pos.normalize().scale(this.speed);
        }
        // apply our current position to the distance we want to travel...
        pos.add(this.entity.getPosition());
        // move our character to newly calculated position...
        this.entity.rigidbody.teleport(pos);
    }
};
As you can probably tell I only made virtually no changes and added the attributes with the addition of (sprint_speed and speed) this gets the job for the demo done for now and is relatively easy to understand. Basically, we take into account our current world orientation then once certain keys are pressed we update our two available axes and apply those vectors to our current orientation in the world, we normalize them to be able to travel diagonally. We then calculate our new position based on our world orientation vector components and multiply them with our delta time (essentially velocity * time) to extrapolate our new position. We take that new position vector and normalize that to our desired speed so that we travel our speed value per frame, then we move our character to that position.
This is using the teleport method, meaning this simply moves the character between two points with no in between. This on it’s own is not an issue so long as we aren’t traveling to fast, but at greater speeds we run the risk of litterally teleporting through object such as walls. To avoid teleporting through walls you may need to premtively check to see the character will collide with a wall, or better yet (if you can spare the resources) use the
AMMO.jspackaged in with playcanvas to simply handle everything for you and simply apply forces to the character and let the physics engine handle collisions (you can still teleport through walls if you travel fast enough)
Camera Controller
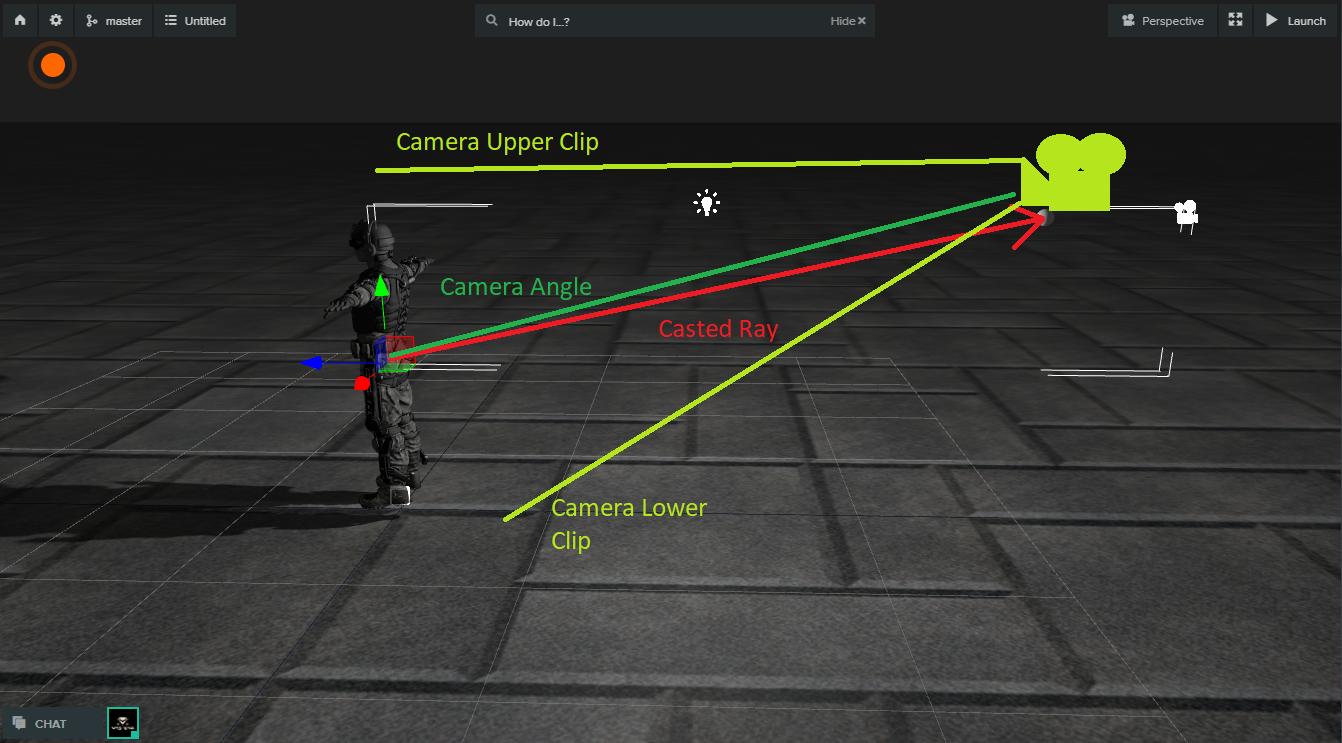
So I’ve also essentially copied the third-person camera system from the same example as before, I made a few tweaks to make it easier to control. Basically, the way this camera works is you have a parent entity of the camera whose origin is in the center of the character or whatever the desired target object is. You then have a child entity siblings with the camera that will be used as an anchor to keep the camera from being too far away or not updating if the ray goes on forever. So every frame a ray is fired and if no collision occurs then the camera position is set to our predefined anchor otherwise the camera position is set to the site of the collision and regardless of collision, the camera is oriented to the initial center parent entity. Finally, any mouse movements are used to rotate the whole ‘system’ (i.e. camera, anchor, and parent entity) accordingly.
1
2
3
4
5
6
7
8
9
10
11
12
13
14
15
16
17
18
19
20
21
22
23
24
25
26
27
28
29
30
31
32
33
34
35
36
37
38
39
40
41
42
43
44
45
46
47
48
49
50
51
52
53
54
55
56
57
58
59
60
61
62
63
64
65
66
67
68
69
70
71
72
73
74
75
76
77
78
79
var CameraController = pc.createScript('cameraController');

CameraController.attributes.add('mouseSpeed', { type: 'number', default: 1.4, description: 'Mouse Sensitivity' });

// Called once after all resources are loaded and before the first update
CameraController.prototype.initialize = function () {
    this.eulers = new pc.Vec3();
    this.touchCoords = new pc.Vec2();

    let app = this.app;
    app.mouse.on("mousemove", this.onMouseMove, this);
    app.mouse.on("mousedown", this.onMouseDown, this);

    // this is essentually our anchor for our camera, and will snap to this point if no object is in between...
    this.rayEnd = app.root.findByName('RaycastEndPoint');

    this.on('destroy', function() {
        app.mouse.off("mousemove", this.onMouseMove, this);
        app.mouse.off("mousedown", this.onMouseDown, this);
    }, this);
};

CameraController.prototype.postUpdate = function (dt) {
    // Center position of our character...
    let originEntity = this.entity.parent;

    let targetY = this.eulers.x;
    let targetX = this.eulers.y;

    let targetAng = new pc.Vec3(-targetX, targetY, 0);

    originEntity.setEulerAngles(targetAng);

    // Find position of camera in world space...
    this.entity.setPosition(this.getWorldPoint());

    // use character position to orient camera so that we are looking at our character...
    this.entity.lookAt(originEntity.getPosition());
};

// everytime we mouse our mouse we fire this method and collect mouse data in event `e`...
CameraController.prototype.onMouseMove = function (e) {
    if (pc.Mouse.isPointerLocked()) {
        // on mouse move across x axis multiply by mouse speed mod by 360 to keep degree capped to 0-360...
        this.eulers.x -= ((this.mouseSpeed * e.dx) / 60) % 360;
        // on mouse move across y axis multiply by mouse speed mod by 360 to keep degree capped to 0-360...
        this.eulers.y += ((this.mouseSpeed * e.dy) / 240) % 360;

        // acount for sub zero angles
        // cap y axis to more user friendly angles...
        if (this.eulers.x < 0) this.eulers.x += 360;
        if (this.eulers.y < 300) this.eulers.y = 300;
        if (this.eulers.y > 350) this.eulers.y = 350;
        console.log(this.eulers);
    }
};

// on click lock mouse in app...
CameraController.prototype.onMouseDown = function (e) {
    this.app.mouse.enablePointerLock();
};

// fire a ray to detect where
CameraController.prototype.getWorldPoint = function () {
    // from our character center...
    let from = this.entity.parent.getPosition();
    // to our camera anchor...
    let to = this.rayEnd.getPosition();

    let hitPoint = to;

    let app = this.app;
    // shoot ray from character center...
    let hit = app.systems.rigidbody.raycastFirst(from, to);

    // return camera anchor or object if in between the two points...
    return hit ? hit.point : to;
};
We also need to make the following changes our movement system previously mentioned, the final product should look like the following:
1
2
3
4
5
6
7
8
9
10
11
12
13
14
15
16
17
18
19
20
21
22
23
24
25
26
27
28
29
30
31
32
33
34
35
36
37
38
39
40
41
42
43
44
45
46
47
48
49
50
51
52
53
54
55
56
57
58
59
60
61
62
63
64
65
66
67
68
69
70
71
72
73
74
75
76
77
78
79
80
81
82
83
84
85
86
87
88
89
90
91
92
93
94
95
96
97
98
99
var MovementController = pc.createScript('movementController');

MovementController.attributes.add("forward_key", {
    type: 'number',
    default: 87,
    description: "forward key ascii value"
});
MovementController.attributes.add("backward_key", {
    type: 'number',
    default: 83,
    description: "backward key ascii value"
});
MovementController.attributes.add("leftward_key", {
    type: 'number',
    default: 65,
    description: "leftward key ascii value"
});
MovementController.attributes.add("rightward_key", {
    type: 'number',
    default: 68,
    description: "rightward key ascii value"
});
MovementController.attributes.add("crouch_key", {
    type: 'number',
    default: 67,
    description: "crouch key ascii value"
});
MovementController.attributes.add("jump_key", {
    type: 'number',
    default: 32,
    description: "jump key ascii value"
});
MovementController.attributes.add("shift_key", {
    type: 'number',
    default: 16,
    description: "shift key ascii value"
});
MovementController.attributes.add("speed", {
    type: 'number',
    default: 0.3,
    description: "the speed in "
});
MovementController.attributes.add("sprint_speed", {
    type: 'number',
    default: 0.6,
    description: "the speed in "
});

// initialize code called once per entity
MovementController.prototype.initialize = function() {
    // Camera...
    var camera = this.app.root.findByName('Camera');
    this.cameraScript = camera.script.cameraController;
};

// Temp var to avoid garbage collection...
MovementController.worldDir = new pc.Vec3();
MovementController.tempDir = new pc.Vec3();

// update code called every frame
MovementController.prototype.update = function(dt) {
    let app = this.app;
    let worldDirection = MovementController.worldDir;
    worldDirection.set(0,0,0);

    let tempDirection = MovementController.tempDir;

    let forward = this.entity.forward;
    let right = this.entity.right;

    let x = 0;
    let z = 0;

    if (app.keyboard.isPressed(this.forward_key)) z -= 1;
    if (app.keyboard.isPressed(this.backward_key)) z += 1;
    if (app.keyboard.isPressed(this.leftward_key)) x += 1;
    if (app.keyboard.isPressed(this.rightward_key)) x -= 1;

    if (x !== 0 || z !== 0) {
        worldDirection.add(tempDirection.copy(forward).mulScalar(z));
        worldDirection.add(tempDirection.copy(right).mulScalar(x));
        worldDirection.normalize();

        let pos = new pc.Vec3(worldDirection.x * dt, 0, worldDirection.z * dt);
        if (app.keyboard.isPressed(this.shift_key)) {
            pos.normalize().scale(this.sprint_speed);
        } else {
            pos.normalize().scale(this.speed);
        }
        pos.add(this.entity.getPosition());

        // Camera...
        var targetY = this.cameraScript.eulers.x;
        var rot = new pc.Vec3(0, targetY, 0);

        // Updated for camera rotation...
        this.entity.rigidbody.teleport(pos, rot);
    }
};
These changes are pretty self explanatory so I will not discuss what they do.
Final Result
Final thoughts
This has been a good learning exercise, there is still more to do such as refactoring the animations such that if “W” and “A” are pressed at the same time I rotate the character model 45 degrees to the left and the same for the right, this is simple enough but there’s still the jumping, and changing collision size for it, as well for crouching too. There are also a few bugs with the states where after the jump animation has played out if you held “W” the character will continue to slide forward without changing to the running animation. Overall this is serviceable and I will probably continue to iterate over this as I learn.